   |


| Likes |  |
| Skill | 5.02 |
| Length | 91.00" 231.14cm |
| Diameter | 4.00" 10.16cm |
| Weight | 15.01lbs 6.81kg |
| Parachute | 65" 165.10cm |
| Drogue | 24" 60.96cm |
| Motor Mount | 94mm-minimum rocket |
| Deployment | Dual-3 Computers |
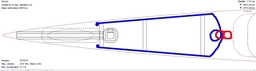
GRIZZLY
OpenRocket / RockSim
 F - L - GRIZZLY DESIGN 2 (snowball from Hell).ork
 Description
Here is the plan.............. long story..
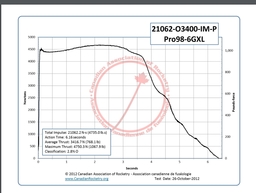
Making a 98 mm MM rocket that is capable to hold a O3400 motor....But might never fly on that motor..
Just the art of building and try to follow Jason in his footsteps going to Black rock in 2017.
Going to that dessert will be a mission on it's own and then flying that rocket in the extreme heat there . . mmhh... thinking twice now... Anyway this rocket is going to be a "Snowball from Hell" when it flies !
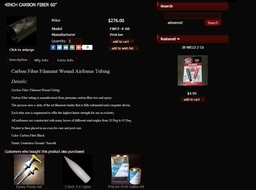
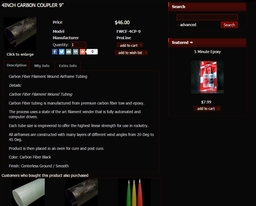
UPDATE 01/10/2016 - Thinking of getting a aluminum fin can for a 4" rocket that FITS a 4" carbon fiber tube from Rocketry warehouse 60" long. Those fin cans have to be assembled with hex screws so there will be a substantial lip showing. That lip will be covered in the fillets made with JB Weld and sanded to perfection. Those fillets might be really thick but give extra strength on the fin can. The fin can will be glued on the Carbon fiber frame with JB weld also. Rocketpoxy might not be good enough for those high temperatures. The nose cone will have ribs (4) going from the tip to the bottom were the Av bay will be or the coupler, not sure yet about the deployment, might use a shoulder on the nose cone just for that extra space needed for the parachute. parachute will be around 80" just a roughly estimate for now (double stitched re enforced, will ask Michael West if he can do that sort of stuff, second opinion needed here). Also the Carbon Fiber frame with the fin can will have extra wraps of CF cloth to make the transition smoother with the fin can. Hopefully all can be sanded to perfection. So actually the frame might be a snitch thicker then the nose cone, but nose cone might also have a wrap of CF..
UPDATE01/14/2016 - extra notes: final wrap over the carbon fiber frame might have kevlar wraps with 3000 high temperature epoxy and a final wrap of 2 oz kevlar.
UPDATE 01/15/2016 - Will be using :http://www.uscomposites.com/hybrids.html - Yellow and black Carbon-Graphite-Kevlar
UPDATE 01/16/2016 -planning to install 1/4" center rings in the nose cone for support, will that help ? just a few, the last one will (on the bottom will be a bulkhead - still way inside the nose cone) for holding a eye-bold for the shock cord...
UPDATE 01/17/2016 - Adjusted design to single deploy main chute to cut down on space and Av Bay position. Deployment charges will be wired to drogue on Altimeters and also the back up, probable the backup +2 sec. Main wire will not be used. (maybe for extra backup) but that will rip the parachute in pieces if going ballistic..
UPDATE 01/18/2016 - Use 4 sheer-pins on booster, will melt away but will be intact on inside. Also no use of QLinks, just loop around the eye-bolts.
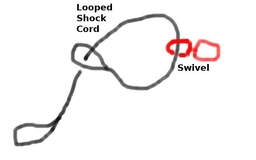
UPDATE 01/19/2016 - Added kevlar bridle and loop and forged eye-bolt in nose cone. DOUBLE SHOCKCORD !!!!
UPDATE 01/20/2016 - Starting looking for sponsors to start the project. Mailed 14 letters to the first potential sponsors.
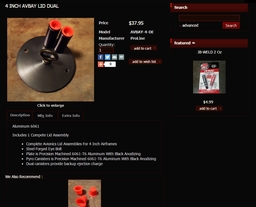
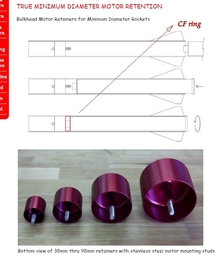
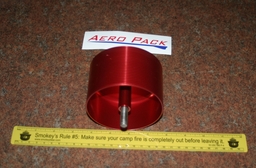
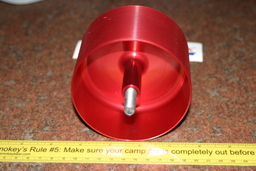
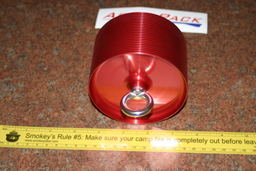
UPDATE 01/21/2016 - AEROPACK confirmed that their retention 98mm fits inside the Rocketry Warehouse 4" Carbon Fiber tubing - ID 3.90 mm / ID 3.896 mm. Those rod extensions will work great with the 75 mm Casing. -http://aeropack.net/min_dia_retainers.asp
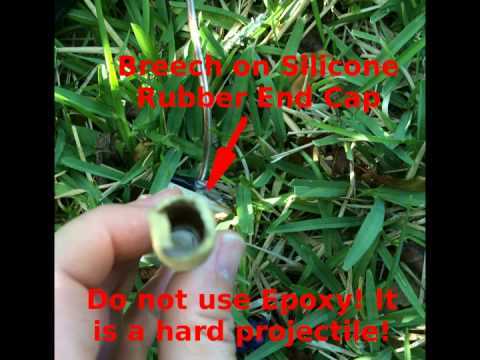
UPDATE 01/23/2016 - I just learned from Jason that the charge wells are around 8" long ! - Pack the FFFg in the bottom of the tube, put about an inch of wadding on top, to hold in place, lightly press it down, after the wadding there is simply empty space tube, you then seal it with an inch of silicone. The air allows the pressure to build up prior to powder scattering and not igniting - like a shock absorber and insures full ignition of the powder.
UPDATE 01/27/2016 - Today Jason gave me a great Idea about chute release - Jolly Lojic has a great device for that, see video on their webpage. https://www.jollylogic.com/products/chuterelease/
UPDATE 01/30/2016 - Orders made for Aeropack Retainer 98 mm and also Fin Can from MaxQ, Retainer will be in the mail next day but the fin can might take up to 3 weeks.
UPDATE 01/31/2016 - Alternative Launch location, but waiting on the waiver... FAR https://www.google.com/maps/place/35%C2%B020'49.2%22N+117%C2%B048'28.8%22W/@35.347,-117.8101887,617m/data=!3m1!1e3!4m2!3m1!1s0x0:0x0
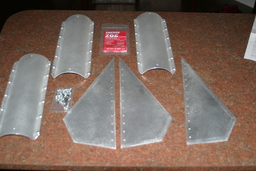
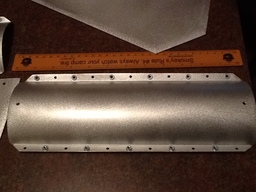
UPDATE 02/03/2016 - MAX Q fins came in, Seems to look really nice and also the way to bolt them on the airframe.
UPDATE 02/17/2016 - Order for Nose Cone made with Rocketry Warehouse, it's already in the mail.
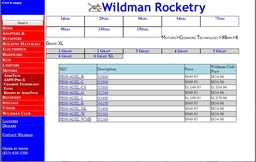
UPDATE 02/18/2016 - Order for Other Items made with Wildman Rocketry, might take a few weeks before those items arrives.
UPDATE 02/20/2016 - Nose Cone arrived today.
UPDATE 02/20/2016 - PAUL STOHR - >>> Here is a picture of my Sky Angel Cert3-XL bundled up with the Jolly Logic Chute release. I used one piece of kevlar to attach to one side of the release, and attached the pin farther down on the same piece of kevlar, just enough distance to allow me to attach the release pin to the chute with a some tension generated by the packed chute.The chute release did it's job and it did hold the bundle together (I did shake test before flight) and deployed as it was supposed to, however since it was a gentle release (compared to being ejected out the payload bay) the parachute did not deploy as fast as I wanted, but did deploy in time. If I were to do it again with a large chute like I would would use the max setting for it (1000 feet) to ensure it has time to open and slow down. <<<
UPDATE 03/04/2016 - Some parts from WILDMAN rocketry came in today. Still missing the carbon Fiber tubes.
UPDATE 03/15/2016 - Started to layout the nose cone interior and ribs, with the 54 mm tube I will have around 12" of space for a tracker in there. Will make a closure with a 54 mm retainer that can screw in and off.
UPDATE 03/21/2016 - Today my Fiberglast order came in. Still waiting on the Carbon Fiber tubing to start the project.
UPDATE 04/12/2016 - Glued the INSIDE nose cone bays together with epoxy. 54 mm bay and 75 mm bay with individual mounting rings. It all fix very snugg. This all has to dry overnight. Also the 75 mm Motor Mouth is glued in with heavy duty JBWeld.
UPDATE 04/13/2016 - Checked the bays, they looks very well bounded together. Now I will put a load of rocket poxy on the rib rings and on the ends of the 54 mm and 75 mm bay and twist it around in the nose cone so the Rocketpoxy will distribute nicely all around... Gave it a good put so it's all snug inside up front. I also put a lot of rocket poxy on the inside screw of the metal nose cone, so that will not vibrate off easily.
UPDATE 04/13/2016 - Last check with Wildman, The Carbon Fiber tubing is in back-order now for a few months. But Jackie promised me they will be finished by next week, so then I can start the real work in progress.
UPDATE 04/20/2016 - This is a link to Jeff his L3 Build with some great information -https://docs.google.com/document/d/1oDX8BMZi9tIJ1huTqEePcDwd9ECnhmAVurYgD93sjd4/edit
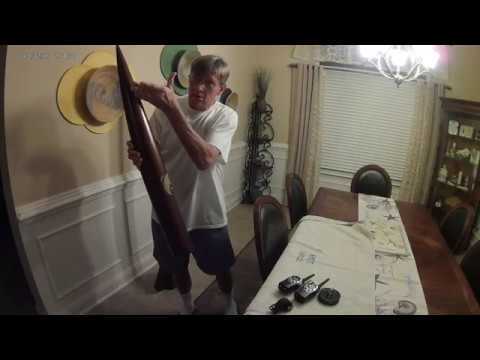
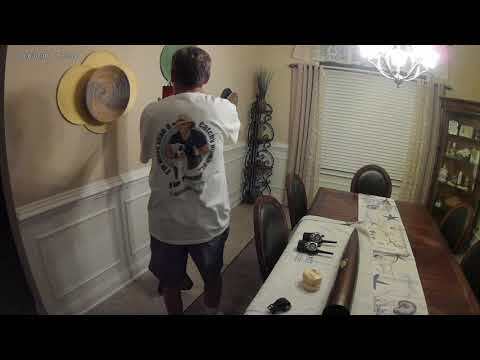
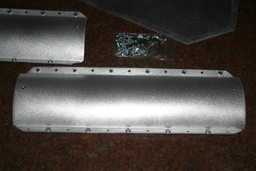
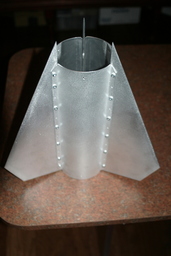
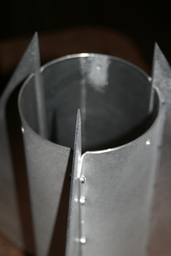
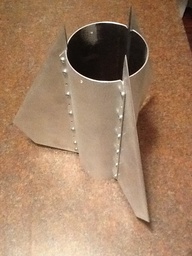
UPDATE 05/18/2016 - Now we getting some where !!! Just got the tubes delivered from Wildman, But the 60" was perfect fit, but the 12" was just a coupler and very thick wall, so they will sent me a new one, that is already shipped out ! Dryfitted the tube and thefin-canalready and it looks great !
UPDATE 05/24/2016 - The smaller 12" frame came in today also, so we are complete on parts now. Planning the 'glue' the aluminum fin-can on the frame with a strip of Rocketpoxy, a strip of JBWeld and a strip of that 'heat' epoxy to make it all solid. And after that..glassing.
UPDATE 06/06/2016 - Stayed home today - storm COLIN - Worked on the AV Bay, drilled two holes 1/4" into the retainer from Aerotech, Lined up with the holes in the Av Bay lids, Just precise !!! Cut down the 2 rods to the size of AV Bay and retainer ! All nuts and washers around to keep things thigh and in place, The combo Av Bay/retainer slides in nice in the main airframe. So that part works great for now.
The combo with the 12" extension and nose cone feel pretty heavy !!!
UPDATE 06/08/2016 - Wildman's Rocket stuff came in - Rocket poxy - after the weekend I will glue the fin can with 3 different glues on the mainframe.
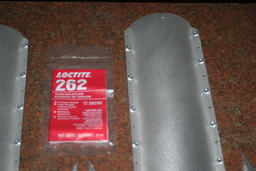
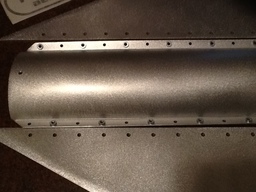
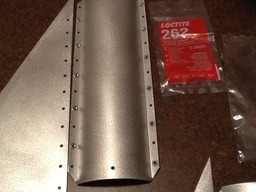
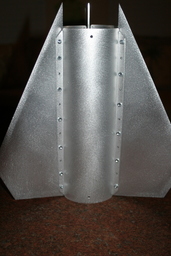
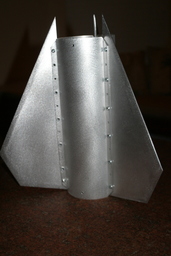
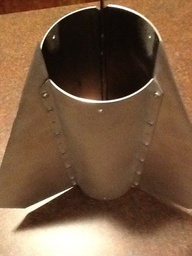
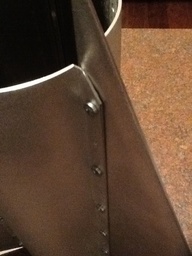
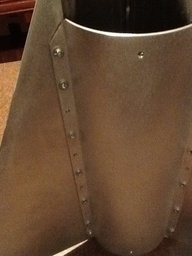
UPDATE 06/18/2016 - Today I did some modification on the Av Bay lid, installed the U bolt. Also recalculated the length of the motormouth and the mainframe and came to the conclusion that I have a play of around 3" So that 3" will be cut off and used on the nose cone to make more space on the upper bay for parachute and chock cords. Also tonight I glued in the fin can on the frame with epoxy / JBweld / heat resistant epoxy.Very tight operation to get all the screws tightened. All is snug and dripping glue out of every joint so when dry that is the max I can do.
UPDATE 06/23/2016 - Today I picked up the 98 mm Casing from Jason Cook. I needed it to make close measurements where to put the stop ring for the motor retainer. I really could not relay on the measurements from Cesaroni on their pdf website, was to critical, so I needed to see that in 'real' life ! Had to sand out the motor mouth a bit to get the casing smooth sliding in. Also the stop ring has to be sanded a bit to get smooth slided in. Now it comes to the point to cut 1 3/4" from the frame to get 4" exposed of the Av Bay when the whole combo is screwed in tight. have like 1/2" play. That would be just fine. The plan is to epoxy the stop ring in without any dripping epoxy exposed outside the ring area. So I will drill little holes in the frame where the stop ring will go and drip epoxy in there and then rotate the stop ring inside to distribute the epoxy. Also the stop ring will have screws like 4 to hold it in place, these screws will be recessed and later covered with the final hybrid glassing wrap. So that will be strong.
UPDATE 06/24/2016 - Fit the inside motor retainer stop ring in a few times to make sure to have the right location. Left a few 1/8" space above the motor casing just in case there is some play, also some play above the stop ring to create some play with the Aeropack motor retainer in case the treat of the retainer does not go in all the way. According the CTI PRO 98 pdf file it should be 1" but that was not the case with Jason Cook his 98 mm casing. The first 1/4" did nor even catch the treats inside. So I have enough space to insert a filler ring to fill up the play space. I will cut a few so in case I need the exact measure I have it with me ! Then I drilled holes in the air-frame for recessed screws (4) to hold the stop ring in place. And also some 5/8 holes (4) to put rocket poxy to make sure that that stop ring is solid inside. All of this will be covered with a layer of Hybrid glassing anyway. All these holes should not be a problem strength wise for the air-frame, There will be a motor casing inside and a retainer and the Av Bay, So there is enough to back up that wall.
UPDATE 06/26/2016 - Some more work on Grizzly today. Replaced the recessed screws with machine screws and lock nut and nut. Also made a bridle loop in the nose cone for the chock cord. Used Rocket poxy and taped it down so there is still plenty room to take the screw lid of the inside storage inside the nose cone !
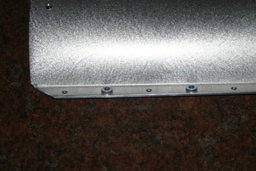
UPDATE 07/02/2016 - Did an fiberglass layer on the bridle and put epoxy on it, Just to make sure. Also glued the nose cone piece in place, the 2" and the 12" frame are now glued with heat epoxy on the nose cone, Still plenty room to reach inside. Also started to fill in the fillets (screws) of the fin can to cover the screws, will do that 2 at the time for not dripping, all will be sanded smooth before glassing.
Update 07/09/2016 - Today I sanded the fillets till the screw head were visible. Used the dremmel and will continue hand sanding till perfection before applying the fiberglass. Was a hell of a sanding job, that Rocketpoxy is a pain in the ass to sand !
Update 07/31/2016 - Sanded some more on the fillets to make them as smooth as possible, will sand some more in the next few days till they are like I want them to be, almost perfect !
Update 08/28/2016 - Has been a while that I worked on this rocket - Busy with other rockets to finish and also work came in the way. Did the last dremmel sanding on the fillets, they are smooth enough for fiber-glassing now.
Update 10/05/2016 - Applied a coat of Hybrid fabric (Kevlar / CF = 5.3 oz) at the fincan and a few inches up to cover the uneven bump. Also applied a e-glass (= 2 oz)on the nose cone.
Update 10/06/2016 - Sanded the Hybrid layer as smooth as I could, this is the last time that U will use Kevlar, it applies as a Bitch and sand really bad... CF is the way to go and in my opinion much stronger and easier to sand smooth.
Update 10/07/2016 - Applying the last coat of e glass (1) on the fin can and the upper part of the booster to cover the holes and the screws that I drilled that hold the inner ring in that stops the 98 mm MM casing from sliding forward and outwards. It also gives more strength to the 'weaker' parts...
Update 10/09/2016 - Sanding for the past few days, 80 and 100 grit, might apply a final layer of epoxy so it all sand smoother then before painting....
Update 10/10/2016 - Applied bondo on the fillets, and sanded it smooth, seems to fill in the fillets better. Very happy that I did that. Now I will apply on thin coat of High Temperature epoxy with balloons and will sand that smooth also. Final laminated coast with balloons is on the booster parts and the nose cone and shoulder, I guess just smooth sanding and then priming and painting.. So happy that this is done so far !!!
Update 10/10/2016 - JEFF HOPKINS ADVICE -More important that maximum speed for the Avionics is the acceleration it will endure. You'd be quite surprised though how things keep working even in 10-20Gs with bad mounting, layout etc. The problem areas are switches and connections (particularly battery). I'm a definite proponent of screw switches, and for not using alkaline batteries. A small lipo is my preference, and again, solder all connections with on/off with a screw switch and the unit will be bullet proof. At O motor diameters you have plenty of room, I like simple sled with holes and zip tied, maybe some 3M double sided adhesive tape for vibration dampening. If doing a battery connection (XT60 etc) or even with alkaline if you're set on it a super capacitor erupted to the flight computer will help avoid possible brown out conditions.
Super capacitor connecter.
Update 10/10/2016 - RANDY APPELBAUM ADVICE - The fin is a 5 inch welded aluminum custom made for a 5 inch 1/8 wall airframe. I used 2 Perfect Flight altimeters for apogee deployment using a 32 grahm co2 canister. Tracking was A 70 cm 100 milwhat Big Red Bee and an Aim Extra for back up. I also had a Merlin RF transmitter on 217.55 band. Bay was in the nose cone. I had 2 Perfect Flight baro only altimeters. It was apogee Rxonly. For a 32 grahm co2 canister. I had a Aim extra gps and a 70 cm Big Rd Beech
Update 10/13/2016 - Evening work, applied primer filler automotive on the booster and nose cone, saw only minor dips to fill up. Will do that with bondo over the weekend. Looks good already !
Update 10/14/2016 - Applied bondo this morning, Will sand this smooth over the weekend....
Update 10/15/2016 - Applied a heavy coat of primer filler today.
Update 10/16/2016 - Sanded the first coat of primer filler a bit, seems to look good, still a little dips but I really don't care for a rocket that will vanish in pieces in thin air someday... Applied a second coat of primer today also.... Next will do some black heat BBQ paint on the fins and nose cone...
Update 10/17/2016 - Painted the Nose cone today in Black heat BBQ paint. The booster needs a bit more touch up on the dips with Epoxy filler.
Update 10/19/2016 - Applied the bondo spot filler, sanded it smooth and primed the top and fins of the booster
Update 10/20/2016 - Applied head paint (black) on rocket booster, fins and top part, also sanded the treated nose cone with 1000 grit and applied another coat of heat pain on the top part. Next is sanding with 1000 grid and primer coat.
Update 10/23/2016 - Applying the primer coat over the BBQ high temperature paint. Sanded that black paint with 1000 grit, but still some uneven surface stuff that is visible, I really do not worry about those thing anymore, will not fly I guess..
Update 10/28/2016 - Applied again sanding and another coat on the fins today, Want them as good as possible, but I can still see some knick-knacks.... But again, that rocket will be shredded....
Update 10/29/2016 - Did on coat of that brown paint today, shows all kinds of crap through ! did a second coat and it covered better the screws on the fins and the other filling stuff I did, Those cans are only 8 oz... to small, I used 2 for those two layers, and have 2 more on order, but some parts really looks nice already .... But it needs more paint and 2000 grid sanding.
Update 11/04/2016 - Applied two more coats on the whole rocket, after 1000 grid sanding, still a lot of imperfections and also the paint. But this is it, will do the beige detail later and then polish and wax that might make it just fine.
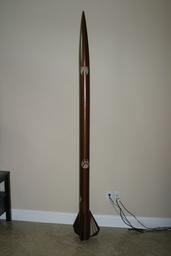
Update 04/06/2017 - Has it been that long ?? One year ?? wow, just made the paint templates cut outs for the rocket: 3 Grizzly paws for the lower frame and 1 grizzly head (cute) for the nose cone section... Will paint it on in the weekend.
Update 04/07/2017 - Taped off the whole rocket ready for painting tomorrow.
Update 04/08/2017 - Painted the icons on he rocket 3 paws and 1 grizzly head, came out just fine.
Update 04/15/2017 - Polish and waxed the whole rocket today.
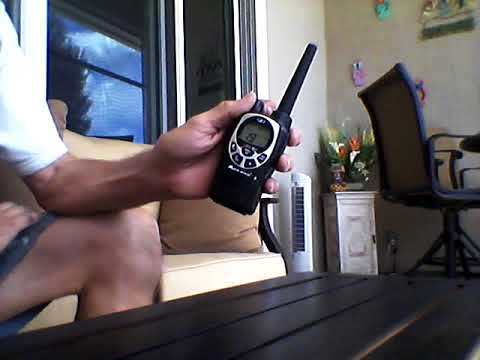
Update 07/16/2017 - Today I ordered the blue tooth, device, transition cable for radio and the gmrs radio's, for the tracking of grizzly.
Update 11/27/2017 - Looking at some hole saws for glass cutting for the window of the AvBay. Also looking for a bottle around 4" that will serve as a view port. Glass needs to be very good also, maybe a teacup... Seems easy to do with the right tools.
Update 01/13/2018 - Lithium batteries, and push buttons.
Note: Advise is spot on with the small brown outs, happens all the time on rockets, that's why I don't have any disconnects for my wiring....and I have solid screws for my mount points. My wires are always glued to the bulkhead so if I pull them, it doesn't pull the wire off the terminal or cause fatigue at the the connection terminal. Lithium batteries are more stable than LIPO, so if it is hot on launch day, you don't have to worry, and they last longer and do not degrade with cold temperatures. I DO solder all other points of my connections, like to the push buttons. The screws leading out the bulkhead are not soldered as they are an extremely solid mount point with tension.electrical tape, with supplying tension to the battery and the contact terminals. And yes, I actually wrap it with mild tension (you don't want too much or your electrical tape will fatigue).. if uncomfortable with 9v mount point due to brownout possibility, DEFINITELY use a solder-able style battery, like LIPO...
Update 01/21/2018 - Started the layout of the sled. All electronics will be on one side of the sled, with vibration damping pads and z-ties, every thing will be secured to da max so that nothing moves around at Max Q or when the drogue comes out and the main. Wires will be all one from stratologger to the igniters. No interruptions in between! They will be long enough so when taking of the lid of the Avbay they will not be tight or even ripped apart from their terminals or connections. Soldering will be done at ALL connections. Just ordered the switches that Jason recommended, pack of two. Very solid ones.
Update 02/04/2018 - Worked on the switches setup a bit, Made a half-curved surface to install them but it turned out to be to high. Switches were touching the Av Bay inner wall, so I cut a sleeve in the sled to lower them a bit, also the curve is pushed down a tad also. I glued it all in temporary with 20 min epoxy. When dry I will do the fitting test again. And if all fits well then I will finish it all off with fiberglass so it will be solid on the sled and not moving. Hope this work at high Mach 2.7 or so.
Also contacted Michael West for a high speed 18" drogue chute with 4 shroud lines and all double/ triple kevlar stitched, waiting for his response.
Update 02/05/2018 - Did some sled work today so that the two switches fit in there and the AvBay. Epoxy all dry and primed.
Update 07/28/2018 - Did a quick conversation with Jason today, about our trip out west, We might just ship the rockets to the local club there and fly to Gerlach and stay there for a few days, which it perfect for distance and 4 wheel drive rental to get onto the Playa.
conversation notes:Just a recap of a possible trip out west...
Need to look into flight to (?) Reno ???Where do we meet, what place are you staying, Bringing the whole family ?? If we are just two, we can rent a car and meet up and share the costs...Need to make box to ship rocket and parts. Wanna stay in the same or close-by hotel as much as possible. Gonna do my paper work for Gary ASAP for a possible L3. If not I might just be there to watch...Is there an answer of the local club to use their equipment ?Are you using rail buttons ???
These a just a few things that went around my head today...Trying to get everything squared away just in case I come along...I know it still far away, just be prepared...Time frame is = Just a few days: One day prep, one day launch, one day to celebrate and get drunk
= = = = = =
Jason Cook: Recap from chat: I have not tried to contact black rock but at the first of the year. I'd be going alone, staying in a hotel in gerlach - so rental cost for car sounds great - and yes, i'll give you a 90 day warning, as I know I can get the electronics done in short order. New: Yes, I'm using 15/15 rail buttons on the lower stage only. Upper stage will be free of rail buttons. It will be easy for me to find a pad to launch from that way out there - I may order a new 15/15 rail and have it shipped direct out there as I am pretty particular and hate sandpaper feeling rails. Lower stage rail buttons won't impact total altitude. I'm sure the club will respond if I call them, write them continuous emails, etc. You have to badger to get a response.Time frame: I like your timespan, but I think we should assume it could could take a few days to get things squared away for setup. This could be due to weather, setup problems, motor problems, electronics problems. If we are both launching, I think the timespan should be increased by two days for the both launches. My plan is to just rent a place out there for the week. Maybe I can watch others launch if it is through a weekend after mine has launched.
Also asked around for the use of 15/15 rail-buttons, as long they are airfoil does not seem any problem.
Update 07/29/2018 Sent out some email to speed up the paperwork process and other parts. Just in case I'm ready not to deal with lose ends.. Also asking around for a discounted maybe used (in good condition) 98 mm 6Xl casing.
Update 07/30/2018 - Frank Schneider gave me a message that he is willing to lent me his 98 mm 6XL casing gen. 2. He already lost a few and will be ordering a new one to go to Black Rock in August/September this year. So when it survived and cleaned up he might sent it to me. I will pay shipping and make a deal for replacement when it gets lost or damaged. So that might save me some $$ to continue my project.
Also got an email from Jamie Clay (jimcgreen@yahoo.com) from Aeropac, hes looking into the matter and will get back to me in a few weeks. If not I will have to remind him about the details we discussed.
Put a list together of all the things I still need to order, check and do.
Update 08/01/2018 - Just got a very disturbing message from Jason and Tim; Applying Carbon Fiber on Aluminum (Max Q - fin-canmaterial)will cause corrosion. I checked my Fin Can when I came home and knocked on it with a hammer and try to bend it, but it looks and feels very solid after two year, since 2016 ! I will investigate it some more and open an area on the solid painted surface and see the bare metal.
<<<Freddy, Aluminum Alloy and Carbon Fiber cause guaranteed galvanic corrosion when bonded directly together. According to Mike Fisher (binder design), you must have some separation layer using something like fiberglass between the two materials. Refer to the following chart, the farther the two materials are away from each other the higher the corrosion rate:http://www.thelen.us/1galv.php
I would have mentioned this sooner but when I felt your fin can it felt like a tin based alloy.
Mike Fisher:Even treatments like alodine and anodizing have limited benefits but are better than nothing. Carbon fiber to aluminum bonds should be avoided at all costs. The best solution for anyone who wants to do this type of thing is to use fiberglass between the carbon fiber and aluminum as an insulator.
Mike Fisher:Anyone considering the same type of project should do the same. One need only to research how many EZ's and Long EZ's canards have failed in flight.......And realize that our rockets can be subjected to much more stress than that.
I'm so glad Tim asked questions, it caused alarms to go off in my head! >>>
Update 08/01/2018 - Since my two rocket friends made me very nervous about aluminium and CF corrosion, I started sanding away little by little of the layers of one fin, The fin has: paint / primer / bondo in some area's / Fiberglass / black heat paint layers / hybrid Kevlar - carbon fiber / epoxy /... Al the layers are still solid together and I could not find any bubbling or 'white' corrosion powder or loose 'dust' that might start the corrosion. Also no dents or marks in the aluminium were found. Will start another area to open up ...
Opened up two area's on the fin can, started sanding layer by layer and all the layers seems to be very solid, had to use the dremmel to get to the aluminum part.... the other area I did not even sand all the way, to hard to sand through the hybrid. seems very very solid. If it is a slow process then it might fall apart in 10 years or so.. But I feel very confident flying this beast..
Asked Mike Fisher for more advice: His response -It will only corrode in the presence of moisture. Also rocket tubing has an insulating layer of epoxy over the cloth. So the carbon is not in direct contact with the aluminum anyway.
Update 08/02/2018 - Started on fixing the 'test' spot I cleared out on the rocket to investigate the possibility of corrosion. Just applied spot bondo for now.
Update 08/03/2018 - GRMS Radio's came in. Did a dry test and they fit nicely in the Nose cone and even plenty space for Bluetooth and RTX tracker. Now I have to get it to work. Will give it a test later this week
Update 08/04/2018 - GMRS Radio test, nop does not seem to work with the Nexus 4, Bluetooth does not seem to pair or connect, Used my 'regular' phone and that works as a charm, no problems there. Did some Google work and it seems that more people have problems with the Nexus 4 to connect the Bluetooth.
Also ordered the chock-cord 7/16 tubular 25 feet from onebadhawk. Teddy has them with loops on both sides.
Also asking around for the O3400 6 Grain XL motor, Wildman is out of stock, CTI (sandy) is on vacation till August 13 and Chris Short had one, Still asking Bernie also for a discount and pick up price, so no hazmat fees there.
Update 08/05/2018 - First initial contact with AEROPAC for Launch permission:
1) Jamie Clay" <jamie@dph.com
<<<< I?ve forwarded this to the powers that be ? we?ll see what we can do.
There is a 25k+ process we use for our regular launches. (I assume you?re going to 52,000 not 52.000 feet)This isn?t something we normally do but who knows?!?If you don?t hear from anyone in the next week, shoot me a pingJamie Clay >>>>
- - - - - - - - - - - - - - - - - - -
2) Jim Green" <jimcgreen@yahoo.com
<<<<Hi Freddy,
We launch in the Black Rock desert in Nevadaon BLM land which is open to the public except during the Burning Man closure period the months of August and September. You can do a private launch there as long as you have a FAA waiver. We get special permission from Burning Man and BLM to hold some of our launches during the closure period.
There is a leave no trace policy in effect for the Black Rock desert. No fire pits. No fireworks. No trash. No human waste. You can have a fire as long as it is in an elevated container.
The FAA requires launches over 50,000' to receive approval from the TripoliClass 3 review committee. Look at tripoli.org for the documentation requirements on over 50k flights.I think you would be better off launching at one of our scheduled launches in June, August, or September. We have daily waivers to 60,000' and 2 hour morning windows to 150,000'. The schedule is at aeropac.org.You would still need to getTripoliClass 3 approval. We have a high altitude form on the aeropac.org website that would also need to be filled out and submitted.
Jim Green
Aeropac president>>>
Update 08/06/2018 - Today I made markings on the Booster tube for the machine screws that hold the retainer connected to the AvBay in place. Other wise it might go spinning when the rocket is under chutes. Also made a center mark line that the retainer and AvBay are lined up properly, purpose of this is that I will drill holed for the push buttons and the window for the phone(s)... This all should be properly lined up when assembling the whole rocket, Will dry run this again when I have the 6 XL cti casing and see how is goes when I screw it on so that nothing moves the wrong way, for now the dept of the avbay and retainer is set. I still can do more adjustments to that, just want it all snugwith the existing spacer, have more spacers cut in case it is needed before I drill the final holes. Also will drill 3 holes in the upper nose cone section, this is for machine screws to hold the flange of the 75 mm retainer in place from unscrewing when it is all under chutes. All those screws will be flush with the outside of the body tube. So I will have to find the proper screws to recess them properly.
Emailed Aeropac (Jim Green) for more specific information about the materials they have or could provided us with, Like 15/15 rail launcher / maybe a tower launcher for a 4" - 3 fin rocket / remote controlled launch system etc.. Hoping on a positive word.
Update 08/06/2018 - Just a reminder for using electronics that they all are equipped with Lithium Batteries, like Stratologgers, GRMS radio's for maximum performance in case if delays. Recommendation is to use Energizer Lithium Ultra made 9 V AA.
Also paid my FCC radio license today good for 1 year I guess...
Contacted Frank Schneider to find out is Aeropac has equipment that they can lent out for out Black rock Launch, like Tower Launcher, remote launch system, ladder..
Reply from Frank Schneider: Freddy, last year Tripoli only had 10/10 and 15/15 rails. If you need tower plenty of people we?re using them. You probably could talk with one of them and borrow it.
Update 08/08/2018 - HAZMAT shipping done by Chis Short, ask to shop motor when I see him in November at Grits, or before.
Update 08/10/2018 - Got an email today again from Aeropac, not so great news, They really push us to launch on their therms on their regular launch days..... Will see how it end up for our 'private' projects..
<<<<Hi Freddy,Aeropac does have 15/15 rails and a small tower launcher for 3 fin rockets. You may use these at one of our scheduled launches. We also have a wireless launch system that can reach a pad 2500' away. You will need to be Tripoli or NAR level 3 to launch these 2 rockets. Additionally these 2 rockets will need to be approved to fly by the Tripoli Class 3 Committee.Bay Area Rocketry is the main vendor who attends our launches. You could buy the motors from him at the launch site. Jim Green >>>>>
Some discussion going on with Jason how to approach this, I might install 15/15 rail buttons and we 'might' go to a regular launch day with some minor support of Aeropac. Also still thinking about the FAR site to go around 50 K with special approval from Rick and FAA. We will have to do a lot of thinking here before we proceed to the next step. But we will get there for sure. Jason is still thinking making / bringing his own 15/15 launcher and making a remote launch system over 1 mile.
Update 08/12/2018 - Chock cords from OneBadHawk came in, really nice tubular kevlar, made Z-ties and that seems to be a real bundle already, also folded the parachute to see how much space there is available, looks like enough but still a second shock-cord might be very tight. Also the drogue still needs to be in there and the chute protector and the charges..... I actually have a total of 12" and that should be enough for all that, The chute protector should be very thin like the red ones I have...
Update 08/13/2018 - Total empty weight of rocket is 6810 grams = 15 Lbs. No Quicklinks used, fully loaded with chutes (2), RTX (no cover), Radio, phone, shock cord (1), AvBay, batteries (2), Stratologgers (2), Charges (2), Sled, Chute release, Nose Cone, Booster...
Update 08/14/2018 - Checked the CG of the rocket fully loaded (empty no motor) and it was close to the Open Rocket calculations - at 46.750", adjusted it in override mode. I was also planning to shorten the Av Bay or some part and reduce the weight at some point but it really does not add up to more altitude, so I leave it were it is right now.
I also inquired at Aeropac (Jim) if there is a minimum requirement for a drogue when going 50 K +, his answer: >>>>>Hi Freddy,There is no drogue or diameter requirement for any rocket flights.The only requirement is that you must recover the rocket within a 10 mile radius if you launch when we have the 150,000' waiver open or within 3.5 miles when we have only the 60,000' waiver open.<<<<<
Also have to look into the charges how to use the 8" plastic tubes and how to seal them.
Also the setting of the chute release at Black Rock at around 3900' MSL.
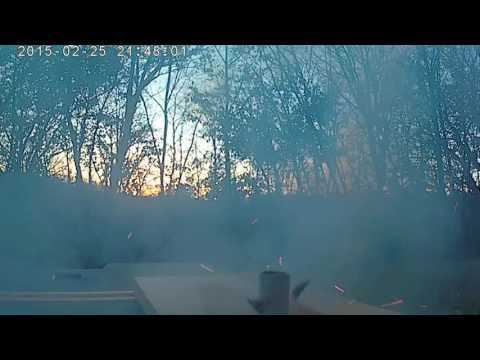
Update 08/16/2018 - Jason posted a video to explain the setup of the charges whichwere successful even in vacuum.
It is also confirmed that the chute release will be no issue in Black Rock (MSL) , just set a safety margin.
CTI (Sandi) White confirmed that the Gen1 and Gen2 - 98 mm 6XL casings just have different treats, the length and measurements are the same
Update 08/17/2018 - Visit Jason after work, got stuck in crash on the dam Buckmann Bridge for 1:30 hrs, But made it to Jason and showed that scary O3400 Motor, incredible heavy stuff.... Made my Bluetooth working with Phone and radio's, all loud and clear !! Thanks Jason. Also borrowed the 98 mm 6 Xl gen 1 casing to line up and drill holes in my retainer and Av Bay. Also checked the radio setting for Channel 19 that I will be using.
Update 08/18/2018 - Started to drill screw holes in the lower section that holds the Aeropac retainer in place from spinning when launching. It takes 7 rotations from the marked marker line to get the screw-holes lined up. So all I need to do is to line up the marker line, let the bold sit on the top of the casing and than start rotating 7 rotations down.
A very great thing is, that the AvBay sits / touches the inner center ring than the holes are lining up perfectly so that is a very very great guide to start drilling the other holes. Very very happy with that project for now.
Drilled the holes in the nose cone also, were the retainer is positioned (screw cap section), they also came out nice. Now I need 1/4" screws to fit in there, I also screwed the holes in the screw cap so the 14" screws will at least fit in there without grinding off the tip, so for a better grip. so far so good.
Gave all the holes more depth to recess the screws more flush, seems to work great but when I pulled off the blue tape, parts of the paint came off also, dam have to pain that again and the fin..
Update 08/19/2018 - Did some more work today, Yesterday I miss drilled one of the nose cone holes to hold the screw part of the retainer in place. I put bondo in it and will re-drill that hole later, Also since the hole in the metal screw cap was getting to big I use epoxy to close it up a bit more, Will use JB Weld when I have it to make it better. I also made a foam cushion that sits on top of the retainer part, so actually the bottom of the nose cone bay to soften the shock of the radio in there.
I did theNexus 4 phone test for temperature, made a 28 min. video, and yes the shutdown was at 138 - 140 F, I heard her a few times saying 138 F.. 138 and then a minute later no more transmission, so obviously the phone shuts down around that temperature, which is around 25 minutes or so.
Update 08/21/2018 - Have to remember to drill vent-holes in the AvBay and under the stratologgers to vent the phone... Also damping cushions made out of cork might help.
Update 08/23/2018 - Got is sanded today, need to prime it than sand smoother and than yellow paint.
Also it's really hard to get the empty 98 6XL mm casing out of the rocket, can not imagine loading a full loaded motor inside the casing and the rocket, looks like a 2 man job.
Went to the store and got the primer, did some primer painting on the exposed spots, hope to finish this off tomorrow with the final coat.
Update 08/24/2018 - Did paint today, light sanded the primer with 1000, and than a coat of paint, when dry light sanding again and another coat of finish paint. It seems that it needs a coat more after dry overnight.
Update 08/25/2018 - Ok final coat done, done done, no more enough already ! next is AvBay setup and orders.
Update 06/29/2019 - Facebook reading:High Altitude Deployment.....
Below is some cut and paste from posts on The Rocketry forum...."so at some point (altitude) you need to start thinking about "is this going to work that high up"? I'm often asked how highs is that? The answer has lots of variables to it. One is what and how are you currently doing your charges? In my opinion the worse charge holders are short and fat with the ematch on top. I'm not knocking you or anyone that uses them! They work! I've used them in the past. They just don't take advantage of all of the BP. Some of it gets scattered before burning. It sort of like the old short cannons...insert short fat cannon link here..http://silverhawkauthor.com/?/...y-Museum--Goderich--Ontari?It worked..but in todays standards not very well. Now this is more like a real charge holder https://news.guns.com/wp-content/uploads/2013/07/iowa12.jpg
There are a couple of interesting videos that show the difference between the ematch on top or on the bottom of the BP.
Ematch on bottom...https://www.youtube.com/watch?v=4UWoBhwvuWs
Ematch on top....https://www.youtube.com/watch?v=xW810k5AySQ
I'm also the guy that invented the latex tubing charge holder idea. It works..but some times, for whatever reason(s) it does not work. In the past I'd tell people it worked up to 104K. There's a new high altitude for it's use now. 200K see photo
The problem with Latex tubing charges is that they don't always work. Neither I or Jim Jarvis can figure out why the don't work sometimes Jim has found that Latex tubing does not fair well in "testing" situations. But it seems to do well in actual flights. I think the "trick" is, that the more jammed packed full your apogee bay is, the more likely the latex tube charges will work.
Jim came up with a method that he uses.https://www.rocketryforum.com/?/article-on-high-altitude-d?/Jim's devices are very efficient consuming 100% of the BP. One thing that was very surprising was how energetic they are! In Jim's write up he states that they are VERY ENERGETIC. Which they are!
I wanted to come up with something that still consumed 100% of the BP but was not as energetic. I started playing around with some 5/16" ID clear vinyl tubing. The finished item (photo) seems to accomplish what I was trying to do. 0.5 grams in my test chamber easily sheared the 3 shear pins, pushed the 76oz ebay complete through the simulated airframe and hit the top of my test chamber. This same set up (0.5 grams of BP) ground tested in my latest 3" min dia rocket sailed the nose cone and ebay 4 feet through the air into my moving blanket back stop without damaging anything. Normally I would have used 1.25 - 1.5 grams of BP to do this. Some notes and (more) rambling....The dog barf is only loosely packed to hold the BP in place and act as a shock absorber of sorts. The match is placed on top of the BP so that the BP is not blown out of the "charge holder" when the match fires. The BP has to pass by the other flaming stuff to exit the charge holder (100% consumed). The electrical tape is only there to hold the ematch and dog barf in place. It does not need to seal in or out in air. All test vacuumed soaked for 3 minutes prior to test. This has not been flown yet! Ground test before trying..
most of the photos are from some recent tests for a 98mm dia rockets...
Tony
Update 01/26/2020 - I just realized that a 4K little Go-pro like camera fits in the Av Bay together with the phones, So I will build a holder that can contain that camera, Actually there will be than 2 windows in the sled and frame for video recording. Mmm...
Trying to figure out the 4K camera setup and phone and leave enough space for 2 batteries and stratologgers also. Batteries and camera and phone will have each their own seating made from fiberglass.
Update 01/27/2020 - Looking at Lithium Ion 9 V batteries now for stratologgers...
Update 01/30/2020 - Ordered 1/8" fiberglass sheet - Wildman / Ordered 2 Battery holders 9V pre-wired and crimped. Stratologgers were not in stock, called Perfectflight, recording left message and want my older SL100 back ASAP, the guy is a jerk ! Still to look in the size of the chute protector and the drogue and main chute... Made a lay-out on the sled to fit all components. Still to order chute protector 18 X 18" / drogue 12" / main 60". Also contacted Jeff Millner if he can sell me 2 stratologgers in great condition. Also contacted Buddy for a 15" high speed chute with 4 shroud linesall double stitched and spill hole.
Update 01/31/2020 - Talked to Bernie today for an order of an 98 XL casing with all the closures, hoping that he gives me a discount an all of this. Jeff Millner will contact me this weekend to give an update on his stratologgers that he wants to sell..
Update 02/01/2020 - I also have my NAR L3 Tripoli approved !!!! Contact Tripoli Headquarters and send copy of NAR L3 .
Update 02/02/2020 - Contacted Rick Maschek from the FAR SITE -Tomorrow at FAR we have 3 projects going to 50,000' and one going to 80,000'. Any project over 'O' impulse or 50,000' requires an FAA COA for a class 3 rocket project (just like you need to do at Black Rock or anywhere else in the US) and you need to submit it to the FAA 45 days in advance. The highest anyone has asked for at FAR was 175,000' and the FAA approved it. https://friendsofamateurrocketry.org/launch-request/ - So that IS great news to go there ! Also shipping a rocket there seems to be no problem.
Tested the GPS out today (video) Phone Nexus 4 in Av-Bay and Radio with Blue tooth dongle in nose cone, all closed up and working. The whole body is Carbon Fiber; only the nose cone and shoulder are Fiberglass... So far good, but will do a more distant testing. My only concern is the heat in the Av-Bay with the phone and electronics and in the Nose Cone.
Update 06/09/2020 - Bernie texted me the prices of the items today, will pick them up at the next NEFAR Launch, this coming Saturday, hoping weather is fine, Has been a while since I launched with the corona virus lock-down. Breakdown: 98 mm 6XL $1.515,00 - / Casing $746,00. He throws in a free wrench and some other items as well. He round is at $2100.-, Like a $ 250 discount and a free wrench and glue and grease etc... And no hazmat shipping shit...
Update 06/14/2020 - Picked up y Pro 98 mm hardware an motor, Bernie give me some extra components. But when I unpacked the Casing box home, I noticed that he had a big ass eye bolt installed on the forward closure, he said he wanted to give that to me to help out, But he did not know that I do not need that and threaded my AvBay in there. He will help out removing the bolt that is secured with Lock-tide, hoping that the threads do not get damaged. Reading all the notes on assembling the motor, will watch some video's also to get more familiar with the process, Seems all straight forward science.
Update 06/15/2020 - Will sent the closure back to Bernie so he can deal with it. Hopefully the threads will be ok. I got it back from Bernie a few weeks ago and it all fits and threads nicely, he did a great job. Bernie is still my Hero !
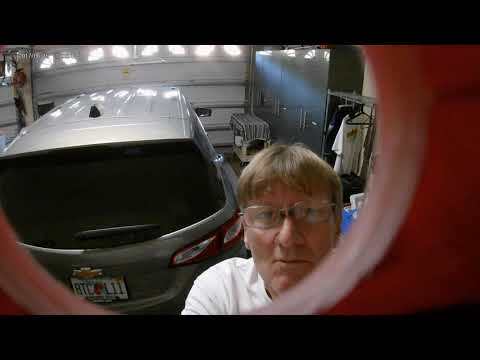
Update 12/23/2020 - Fitting the GoPro camera with the Avbay window now. Made two video's and they all look great to proceed. The edge of the window will be visible but that will be no issue.
Update 12/24/2020 - Found a website for heat resistant plastics that can be curved. Hope they respond and have the right thing.Polyethylene Plastic | Materials & Products | Acme Plastics
Update 05/20/2021 - Still looking around for bendable glass, Looking into Corning Willow glass .02 mm and hoping to get sample soon, if they agree on that.
Update 06/13/2021 - That Corner-Willow glass did not work at all, when making the 4" bend it broke. The window solution just came in ! Jason ordered two something around 4" lab beakers that will have the right curve, less than 4" !! like 3 5/8" and that will be perfect !! He already cut the pieces and also some cuts for GRIZZLY, so finally I can move on with that project as well. I hope I see Jason at the next launch day at Palm Bay to get those glass pieces.
Update 06/28/2021 - Jason mailed me those cut glass pieces and they are the right curvature and size. Thanks Jason it all will work out just fine. Now I can move forward with this project.
Update 07/04/2021 - Jason did mail me those glass windows with the exact curvature. real nice, But when I installed them in my Project X rocket I noticed that they had some distortion, not much but noticeable. I made some test video's with the phone and the GoPro camera and you could see it in the stills a bit. After talking to Jason for a while he insisted to cut new windows for the Grizzly rocket, His beakers did not had that distortion he said, so all I need is two windows. I was actually fine with the ones he send me but he wants to make it perfect so at this time I will be waiting for those two windows to be installed in the Grizzly rocket. Also today I cut the holes in the booster for the GoPro camera and the hole for the Phone camera. Also two smaller holes for the switches, hose are all lined up perfect. Now the booster window was a bit off with the screw-holes, I do not want to adjust anything there, I just line up the window holes and drill new holes for the screws. Actually those screws are not needed, It was just a safety for keeping the AvBay from spinning lose from the casing. But still I will use those screws (4). The AvBay is screwed with a rod into the motor casing so that will not separate. But just to secure it better I will use those screws.
Update 07/20/2021 - Window are in, epoxied in with black die mix to keep the reflections minimal. SO now I can start the electronics and plan for next year April 2022 event at FAR. Those new windows were re-cut by Jason and they seem to have minimaldistortion. They are really nice. I sanded the inside of the AvBay a bit out so that the window sits closer to the edge and more room for the GoPro camera also.
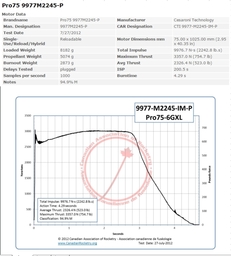
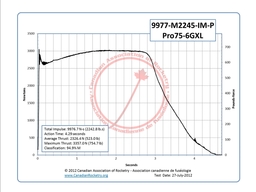
If I back out of the O3400 motor then I will sure fly it on a 75 mm 6XL motor..! Actually nop, I'm already launching my Project X rocket in Kansas on a 6XL motor - M2245.
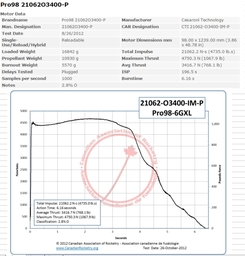
98 mm CTI Casing dimensions - http://www.pro38.com/pdfs/Pro98_dimensions.pdf
98 mm CTI Motor assembling -http://www.pro38.com/pdfs/Pro98_notes_V1.5.pdf
98 mm CTI Motor assembling -https://www.youtube.com/watch?v=whA9r4xzXK8
98 mm CTI Motor instructions -http://www.pro38.com/pdfs/Pro98_Instructions.pdf
http://www.pro38.com/pdfs/Pro98_notes_V1.6.pdf = O3400 product notes
LEGAL STUFF -http://www.ahpra.org/b2k.html
- http://www.tripoli.org/Portals/1/Documents/C3RC/Project%20Submission%20Template.pdf
-http://www.tripoli.org/Portals/1/Documents/C3RC/Class%203%20Package%20Example.pdf
-http://www.tripoli.org/Portals/1/Documents/Safety%20Code/OPSC%202013%20v1.0.pdf
- http://www.rocketryfiles.com/files/Technicalarticles/Jim_Jarvis_Highaltitude_deployment_2013.pdf
- http://www.rocketryforum.com/showthread.php?136898-Hermetically-Sealed-Ejection- Cap&p=1631047#post1631047
- https://www.apogeerockets.com/education/downloads/Newsletter286.pdf
- http://pratt-hobbies.com/info_pages/pyrodex/pyrotest.htm
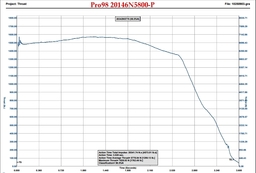
- http://badass-science.com/TamingTheN5800.html
- https://publicmissiles.com/secure/images/AccuFireTimerInstructions.pdf
- http://www.aeropac.org/ (Launch calendar)
- http://com-spec.com/rcplane/index.html
- http://aeropac.org/files/Finding.the.Launch.Site.pdf
-https://www.apogeerockets.com/Building_Supplies/Launch_Lugs_Rail_Buttons/Rail_Buttons/Large_Airfoiled_Rail_Buttons
-https://www.buytwowayradios.com/gmrs-fcc-licensing
- https://www.fcc.gov/general-mobile-radio-service-gmrs
- http://wireless.fcc.gov/uls/index.htm?job=home
-http://www.tripoli.org/C3RC - 50 K flights
-http://www.tripoli.org/Portals/1/Documents/C3RC/Class%203%20Package%20Example.pdf - Class 3 Package example
- http://www.tripoli.org/Portals/1/Documents/C3RC/Project%20Submission%20Template%202018.pdf - Class 3 Submission form.
-https://www.faa.gov/documentLibrary/media/Form/7711-2_08-08.pdf - FAA Waver document
-https://www.wunderground.com/history/monthly/us/nv/lovelock/KLOL/date/2017-12 Derby Weather station Black Rock
- HIGH POWER LAUNCHES - Different motors:https://www.youtube.com/watch?v=ErilT_4aftQ
- https://www.AcmePlastics.com- Plastic window
Launches
| Date | Title | Likes | Weight | # | Status | Altitude | Velocity | Motor | ||
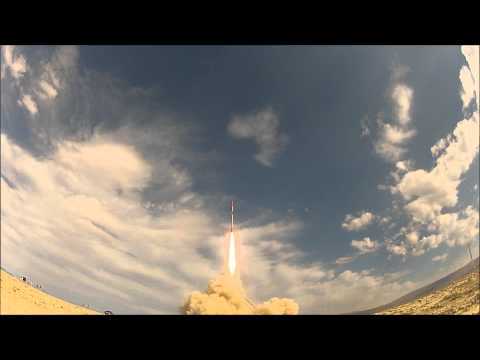
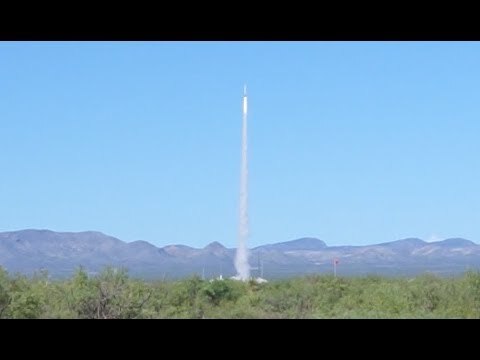
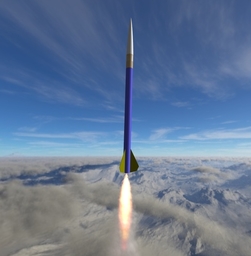
| GRIZZLY - FIRST FLIGHT | | 15.00lb. 6.80kg | 1 | Pending | ?55957 ft ?17055.69m | ?2019 MPH ?3250.59km/h | O3400-INSANE |

Video
 |
 |
 |
 |
 |
 |
 |
 |
 |
 |
 |
 |
 |
 |
 |
 |
 |
 |
 |
Images

 1 2 3 4 ... 11
 |
 |
 |
 |
 |
 |
 |
 |
 |
 |
 |
 |
 |
 |
 |
 |
 |
 |
 |
 |
 |
 |
 |
 |
 |
 |
 |
 |
 |
 |
 |
 |
 |
 |
 |
 |
 |
 |
 |
 |
 |
 |
 |
 |
 |
 |
 |
 |
 |
 |
Comments
When will you start the build?
Trying to find sponsors Tim, completely out of money for now. still have to fly my "Thunderstruck" on an L motor and then also on an M for my L3 cert.. Will see, but I'll get there ! It will be an all or nothing project ! An you know me it will be a....... project !
Do you have an OpenRocket file? Can you upload it for all to see?
Tim, I will post that soon, working on the detail. It changes almost every day as I work and look at it !!!
timcub on 2016-01-28 14:30:12Z wrote:
What was the other launch site you were telling me about. Not Black Rock but some other place??