   |


| Likes |  |
| Skill | 5 |
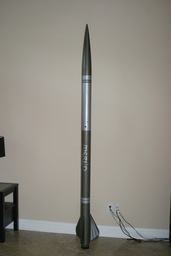
| Length | 99.00" 251.46cm |
| Diameter | 4.00" 10.16cm |
| Weight | 17.64lbs 8.00kg |
| Parachute | 70" 177.80cm |
| Drogue | 34" 86.36cm |
| Motor Mount | 75mm |
| Deployment | Dual-2 Computers |
MERLIN
Description
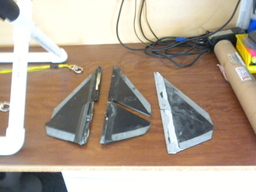
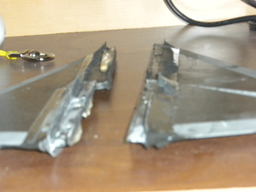
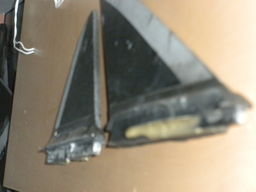
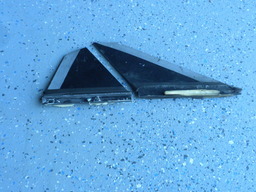
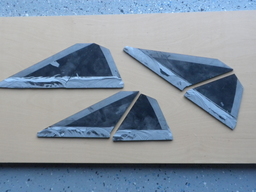
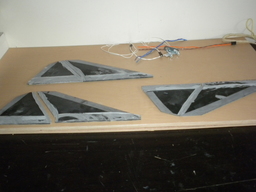
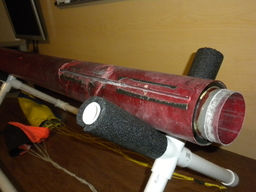
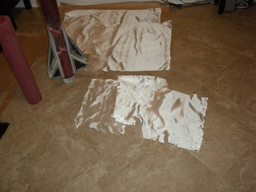
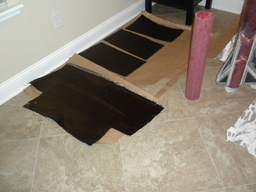
Here we go again.... Got some parts from a dark star CATO from Deep, Clayton's friend.... The fins separated clean from the body tube, yes all 6 of them ! The lower part of the tube has some light cracks, but that can be fixed with carbon fiber glassing. This is again another extreme project but love to do it and make it fly again, So I got the lower body tube, the 6 fins and the intact motormouth but no retainer. Will make some orders at Wildman for the upper tube and Av Bay and Aeropack for the Motor retainer 75 mm !!! Yes !!! And Madcow for the fiberglass wound nose cone metal tip !
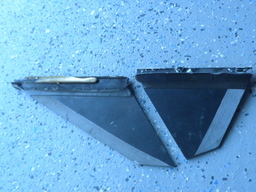
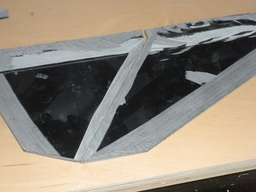
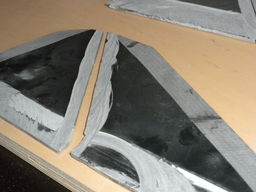
Update 11/14/2016 - Plan is to make from the upper fn and the lower fin just one complete fin assembly. Grinded the excess rocket poxy off the fin root and also made some grooves in the two parts were the two fins will meet and were the rocket poxy will be done. Also did some smooth sanding.
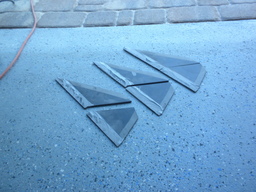
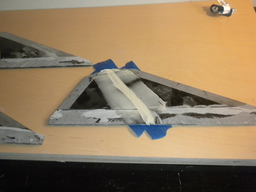
Update 11/15/2016 - Applied rocket poxy on the two fins so they will be glued together, lined them up very carefully and put blue masking tape on the epoxy part on both sides. All 3 fins done and taped up and put some heavy weight on them to keep them flat !
Update 11/16/2016 - Cut the slots out of the fin body tube to make it one long slot to get he fins in. Was easy, Because Deep did not apply epoxy that much, really not much for such a big powerful rocket !
Update 11/17/2016 - Installed the first crucial fin, with rocket poxy... this will be the alignment fin to guide the others. Hope they come out perfect. Also glued in the second fin made a template for the alignment.
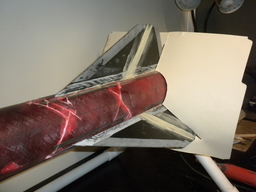
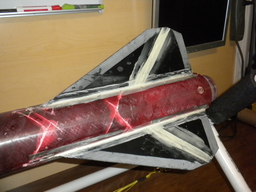
Update 11/18/2016 - Installed the third and last fin, they all are perfect and measure 11-3/8" separation between them, tip to tip. When this is dry I will fill in the fillets with rocket poxy. And also add a forth centering inside on top of the fin-tips. To make sure that the whole assembly is rock solid.
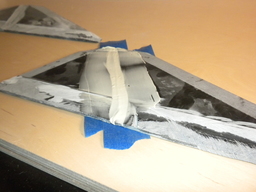
Update 11/18/2016 - Late night, third fin dry, inserted the top center-ring all the way inside the tube, had to cut out the spaces for the shock cord ans also had to sand the rind inside and outside down a bit to make it slide smooth all the way on top of the fins, After a few tries it worked, no obstruction with glue residue or so from the previous builder.... Also applied rocket poxy on the fillets and smeared it out as smooth as I can, When dry it will be sanded a bit before the carbon fiber cloth goes on there..
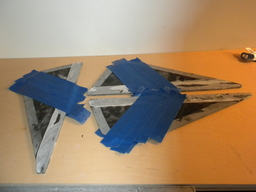
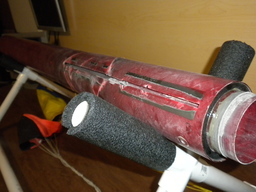
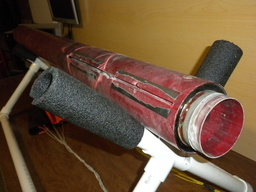
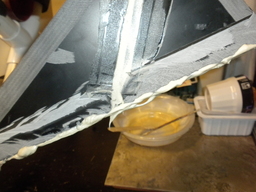
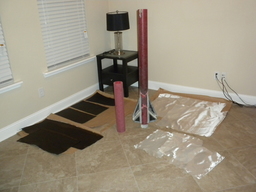
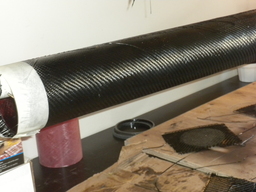
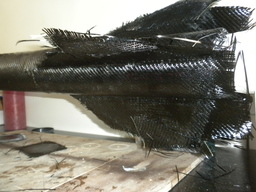
Update 11/21/2016 - US Composites order came in.. Pre cut the CF pieces for the rocket... Will be only one CFwrap and two E-glass 120 wraps. The fins will have serious all around wrapping also.
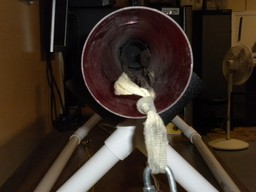
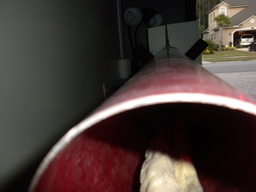
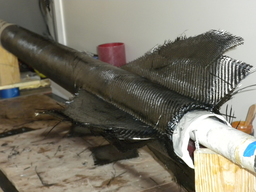
Update 11/23/2016 - The Aeropack 75 mm retainer came in yesterday. I glued it on the MM with the last JBWeld, lost of its queezed out of the tubes !!!. Lots of excess that I taped off with masking tape so it will dry kinda flat and smooth. Also Sanded all the uneven and fillets on the fins so that will be ready to glass in the morning. Kept it all inside the house so the epoxy and cloth and rockets are warmer. All carbon fiber and E Glass 120 pieces are cut at this point.
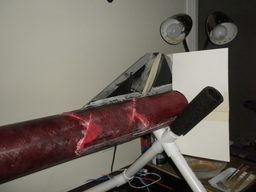
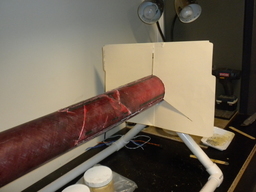
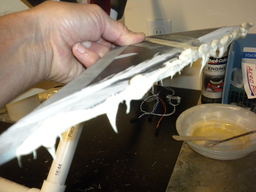
Update 11/24/2016 - Wrapped the upper frame and the body tube with carbon fiber today. Also the fins have a tip to tip true wrap. All looks great and will be dry in the afternoon. Then I cut the excess off and start sanding. next is two wraps of E120 glassing. I hope the rocket gets some weight by doing all this so I can get my Level 3 at NEFAR Bunnell field and stay under 10.000 feet. Also the fiberglass bulkhead have a layer of Carbon Fiber on the outside to make them stronger. They look a but to thin for my taste.
Update 11/25/2016 - Today I cleaned up the Carbon Fiber and sanded the rocket smooth. Did some deep sanding with professional grade 80 and went to deep on the fins, applied bondo to fix it..
Update 11/27/2016 - Did the final two wraps of E120 Glass on the top section, booster and tip to tip fins. Used a lot of epoxy and will smooth it out later and some sanding also.
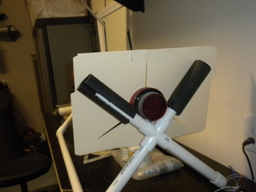
Update 11/29/2016 - Installed the stop rings in the Av Bay on both sides and put some epoxy to hold them in place, Also did a finish coat of epoxy on the lids.
Update 12/02/2016 - Nose cone was delayed, wrong delivery address, and shoulder is missing. Did a clear coat of epoxy on the booster and upper frame, will sand everything smooth when dry in a few days. Also the lids of the Av Bay do have an extra carbon fiber layer and a clear epoxy coat. Stop rings inside Av Bay are installed.
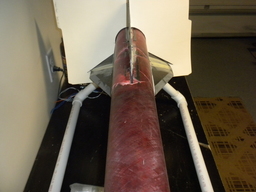
Update 12/03/2016 - I Started to sand the rocket parts with 100 grit professional sandpaper, Rocket parts need a lot of sanding and maybe a clear epoxy coat after again. Also finished the nose cone build up with the E120 fiberglass when dry I will sand and do a clear coat again till smooth with the upper frame.
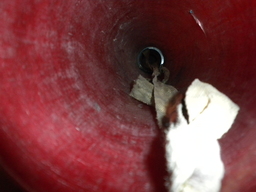
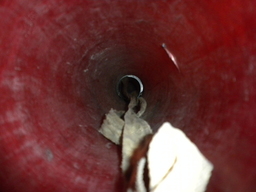
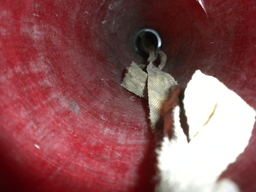
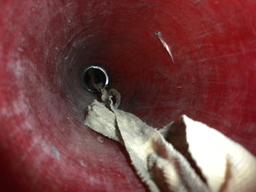
Update 12/04/2016 - Worked on the Av Bay today, did get all the nuts and washers and cut the rods in size and fastened everything. Also installed the U-Bolts, still have to epoxy all those nuts. I also installed the charge wells, two for main and one for drogue.. Still have to install the connectors. Made my order for Doghouse Rocketry today for the wiring part.
Update 12/06/2016 - Worked on the inner bulkhead of the nose cone, that fits and will be glued on top of the shoulder and slide inside the nose cone. Installed a U bolt that will be secured with rocket poxy.
Update 12/12/2016 - Evening after work, did the fillets with rocket poxy, tapes around the fillets for easy clean up. Waiting to dry to sand next day. Did also a pre sanding run again to make the fins smoother and more flat.
Update 12/13/216 - After work, did sanded the fillets smoother and gave it a coat of bondo, will sand when all dry.
Update 12/14/2016 - Noticed that the bondo did not dry as expected, maybe not enough hardener ? But started sanding anyway... Will probably redo it, will sand away as much as I can and see then. Also glues the bulkhead with rocket poxy on top of the shoulder. U-bold was already in from before. put some dots of Rocketpoxy on nuts of U-bolt inside the bulkhead/nose cone.
Update 12/15/2016 - Did a wide trench of bondo again in the fillets, used more hardner then before, will sand the whole fillets out with a 1/2" pipe and sandpaper so they have an equal look. Also have to sand the shoulder more, after attaching the bulkhead with U-bolt it all became to smug to apply epoxy, Will sand till it fits and slide better.
Update 12/16/2016 - Bondo in fillets all dry and hard, started sanding with 3/4" OVC pipe and that seems to work great, Will finish off with 150 grid so the sides blend out smooth to the fins and body frame. All good, almost ready to paint.
Update 12/17/2016 - Saturday afternoon, did a primer coat on the fin can to see the fixing spots, and yes plenty of them, used the bondo filler tube to treat them and when dry I sand again. Also slided in the shoulder in the nose cone, had to sand the bulkhead and top of shoulder to make it slide a bit easier. Put epoxy inside the nose cone and yes it all slided in very nice and have the exact lengths exposing. Also put epoxy on the screw that holds the tip of the nose cone. Just to make sure it does not unscrew! Before I also sanded the transition between nose cone and upper frame to make it snug fitting. I also will do the same with the lower frame and the upper frame to make it equal fit with no groove showing.
Update 12/18/2016 - Applied new coat of primer after sanding, applied bondo filler, sanding again..Then priming again on all parts. then applying bondo filler again to make all smooth.. Again some bondo filler application and sanding, then a coat of final primer.. Sanding sanding sanding, endless process..... The total weight of this rocket is estimated at 8200 grams, thats like around 18 pounds, not enough to keep it under 10 K on a M impulse motor.
Update 12/19/2016 - I glued in the Av Bay stop ring (fiberglass) to prevent the Av Bay from sliding all the way inside the upper air frame. The Av Bay will also be secured with 4 nylon screw.
Update 12/22/2016 - Yes I did another primer coat, will lightly sand with 220, and the probably paint the base paint coat. Still have to drill the 'window' and the AvBay screw holes.
Update 12/23/2016 - Did some work on he Av Bay, drilled all the holes, screws / air vent holes and the camera window. Was a bit off in the main frame at first but could correct it, will use some bondo to plug the error hole. No sweat. All comes out nice. This weekend probably some 220 grid sanding and then painting. Voila...
Update 12/24/2016 - For two days I've been painting the rocket frames, the cast Iron coat paint really is a bitch to paint on.... sanded a few times in between coats but still have some flat looking area's... Did a Black BBQ heat paint in the lower frame and hope to do the final coat tomorrow... ahhrrr !!! Very frustrating !!
Update 12/26/2016 - Ok I think I'm F$#@$%ng done with the paint job, did some final coats toda yand still have some dull spots, will try to get that out with polish and waxing !!! Still need to do the design on fins and ring on body frame, small stuff for tomorrow... That will be it, oh and drilling sheerpin holes !! Done !!$#$$#$@#W@#@$#@#$ !!!!
Update 12/27/2016 - Finished painting the lighter color on the rocket, that's it for the paint job !!!! No more !! Next is sheerpin holes, Glass window and Pyro testing ! Also Polish and waxing...
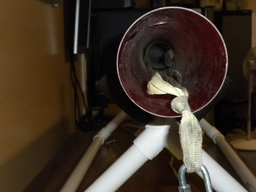
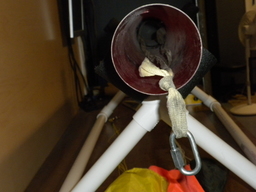
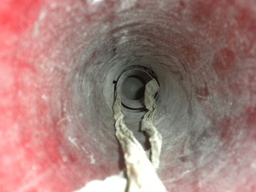
Update 12/31/2016 - Shock cords came in from OneBadHawk, 2 X 3 loop 25 feet long. Attached the nomex chute protectors and one quicklink in the nosecone, Need more quicklinks. Also glued in the glass round window very carefully.
Update 01/01/2017 - Made the insides of the switches holders, seems to work great, when dry they will be glued in the Av Bay.
Update 01/02/2017 - Finally glued the switch holders in and also installed the switched !Only sheerpins and pyro todo !
Update 01/08/2017 - Got it finally done, the sheerpins are in, Nose cone 3, body frame 2. Did the polish and the waxing and the paint came out a bit better, that iron cast paint is really a dull texture.. but hey it shines great now, happy with the result. Next is Pyro testing...!! yeah..
Update 01/28/2017 - Finally got some rail buttons installed on the rocket ! They are glued in with the screw with rocket poxy !
Update 04/10/2017 - Painted the lettering "MERLIN" on the lower frame in that silver cast iron paint. Was a bitch to cut those out BUT after a struggle attaching the lettering on the rocket it came all out good. In a few days I will polish and wax that part. Love it !!
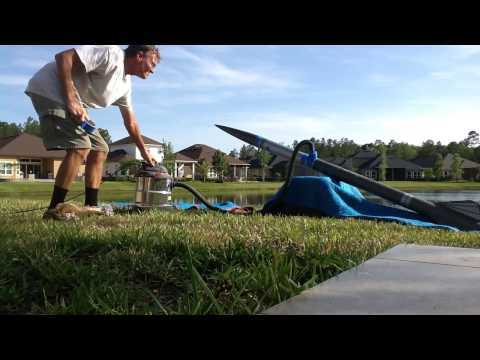
Update 04/17/2017 - Did the pyro test today after work, had everything setup the day before (eater Sunday)... Charge was 'only' 1.8 grams of FFFFg, and all separated great, the final charge will be 2.0 and 2.4 for back up. Just to be on the safe side.
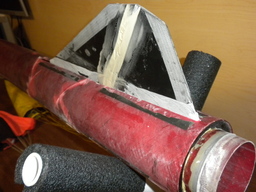
Update 04/18/2017 - Jason 'gave' me his nexus 4 phone to try out the new IR app. very excited to fly that in the first launch/flight and get the data and video immediately uploaded to youtube.. The only negative thing is I have to modify the sled and build up some fiberglass to hold the phone in place. I started that already after work, did the top and bottom one.
Update 04/19/2017 - Still working on the sled, all the uprights Fiberglass are in with epoxy 30 min and today I applied rocket poxy to make it stronger, have to sand the corners down to fit inside the av Bay. Then make the angle for the phone.
Update 10/25/2022 - Replacing the window�with a bigger�window, same glass that Jason Cook gave me a while ago for the Glizzly and Project X rockets.
�
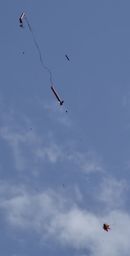
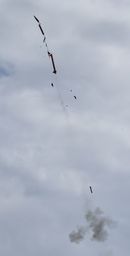
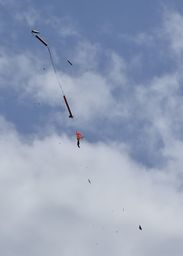
Drogue parachute 24" - Main parachute 70" X form (M. West)
Charges: DROGUE 2.0 grams/2.4 grams - MAIN 1.8 grams/2.2 grams FFFFg -
Summary | |||||
| Total Launches | 5 | Highest Altitude | 10273 ft 3131.21m | Cumulative Altitude | 22523 ft 6865.01m |
| Total Fail | 0 | Highest Velocity | 644 MPH 1036.84km/h | Average Altitude | 4504 ft 1372.82m |
| Average Motor | K | Average Thrust | 695 | Total Thrust | 3479 |
| Motor Sum | M | Motor Failure | 0 | Average Speed | 357 MPH 574.77km/h |
Launches
| Date | Title | Likes | Weight | # | Status | Altitude | Velocity | Motor | ||
| MERLIN - SEVENTH FLIGHT | | 17.64lb. 8.00kg | 1 | Success | 3295 ft 1004.32m ?3772 ft ?1149.71m | 299 MPH 481.39km/h ?346 MPH ?557.06km/h | K630-15-BLUE STREAK | ||
| MERLIN - SIXTH FLIGHT - NO GO WEATHER | | 17.64lb. 8.00kg | 1 | Other | ?2326 ft ?708.96m | ?252 MPH ?405.72km/h | J449-15-BLUE STREAK | ||
| MERLIN - FORTH FLIGHT | | 17.64lb. 8.00kg | 1 | Success | 3241 ft 987.86m ?3331 ft ?1015.29m | 288 MPH 463.68km/h ?310 MPH ?499.10km/h | K500-18-RED LIGHTNING | ||
| MERLIN - THIRD FLIGHT | | 17.64lb. 8.00kg | 1 | Success | 2350 ft 716.28m ?2543 ft ?775.11m | 254 MPH 408.94km/h ?265 MPH ?426.65km/h | K454-19-SKIDMARK | ||
| MERLIN - SECOND FLIGHT | | 17.64lb. 8.00kg | 1 | Success | 3364 ft 1025.35m ?3320 ft ?1011.94m | 300 MPH 483.00km/h ?310 MPH ?499.10km/h | K500-18-RED | ||
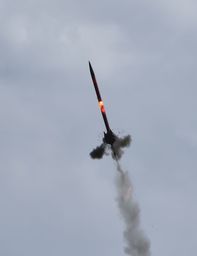
| MERLIN - FIRST FLIGHT | | 17.64lb. 8.00kg | 1 | Success | 10273 ft 3131.21m ?9798 ft ?2986.43m | 644 MPH 1036.84km/h ?689 MPH ?1109.29km/h | L1390-MAJOVE GREEN |


Video
 |
Images

 1 2 3 4
 |
 |
 |
 |
 |
 |
 |
 |
 |
 |
 |
 |
 |
 |
 |
 |
 |
 |
 |
 |
 |
 |
 |
 |
 |
 |
 |
 |
 |
 |
 |
 |
 |
 |
 |
 |
 |
 |
 |
 |
 |
 |
 |
 |
 |
 |
 |
 |
 |
 |
Comments
Merlin is looking good! I bet Deep will want it back too - haha!
Magnificent! Looking forward to seeing it fly!
Thanks Jason, Just ordered the Shock cords from oneBadHawk...Will fly in February... Indeed a headache and lots of work....
esotericdude on 2016-12-24 00:01:18Z wrote: